Showing posts with label Celinho. Show all posts

Tuesday, 30 April 2019

GP4: 1996 McLaren MP4/11 walkaround part 3

This is the third installment of my McLaren MP4/11 walkaround of the GP4 car originally created by Eugenio Faria and completed by me, painted by Celinho with help from Soulbringer and Quickslick.
After Hakkinen's huge accident at Adelaide in the final Grand Prix weekend of 1995, thankfully the Finn was able to take part in the 1996 season, losing none of his speed. The accident brought Mika and Ron Dennis closer together, with Coulthard claiming that Mika garnered favourable support due to their closer relationship, in part due to the accident in Adelaide.
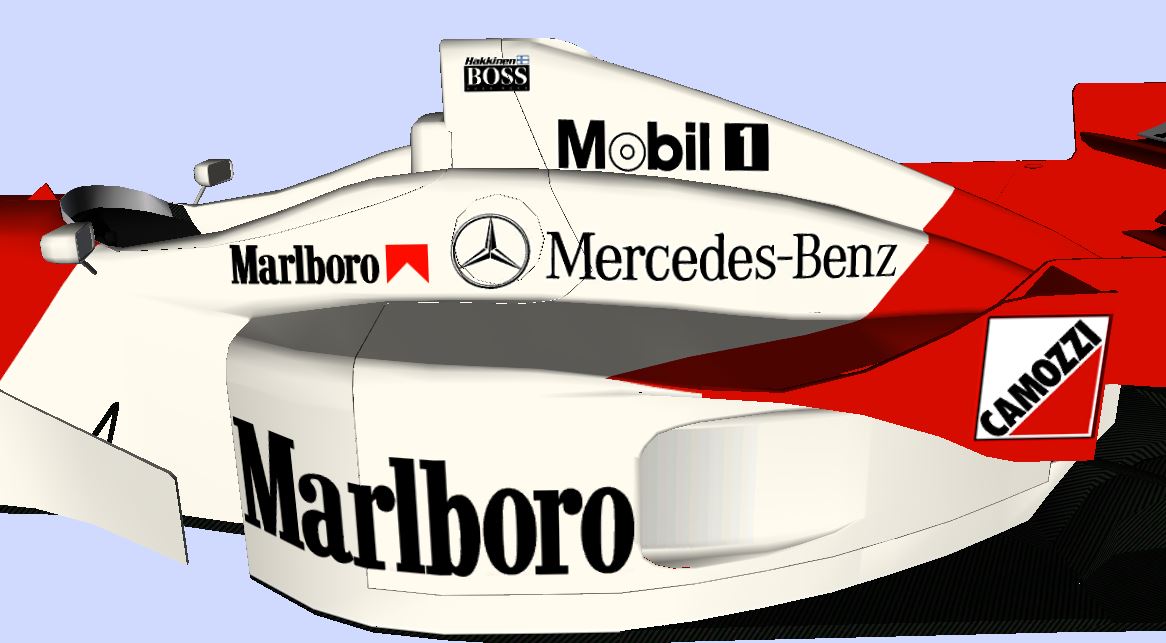

You can see the bodylines go past some interesting curves around the car, all of which takes time to do and get right. I added the very small fin at the top of the rollover bar, something similar to the shark fins of recent years. Eugenio did some good work on the smooth radiator outlet at the rear of the sidepod, I simply resized it to match the proportions of the real car. The winglets from the rear wing are also nicely done.


You can see how the winglet is attached to the engine cover, whilst the rest of the endplate is attached to the rear wing assembly. The rear suspension and diffuser area was all added by me.


Here is a clearer shot of the rear of the car with the diffuser. The side fences of the diffuser are quite high, ensuring the air from the rear of the coke bottle shape is not disturbed by the opening for the insides of the car.


The car has a relatively simple internals, with the radiators, airbox, engine and cylinders/exhaust and rear suspension elements. The standard texture mapping means the engine is still a Renault albeit mirrored. You can see a non-textured version below:

So that's it, the 1996 McLaren MP4/11 for GP4 done. You can find this car as part of the GP4 1996 mod and converted in other games.

You can compare the car against the 1/43 model here: https://fongugp4.blogspot.com/2019/03/143-model-review-1996-mclaren-mp411.html

Monday, 29 April 2019

GP4: 1996 McLaren MP4/11 walkaround part 2

The McLaren MP4/11 was powered by the Mercedes engine, their second season with their new partners that would last through to 2014 and enjoy many competitive seasons. But 1996 was a rebuilding period. New driver, David Coulthard revealed in the recent F1 podcast that he signed for McLaren just before Christmas of 1994, having signed for Williams earlier the same day for 1995.

We must get back to talking about the car as we delve into the details on this GP4 creation.

The front wing is Eugenio's work and on the endplate I added the indent near the bottom. It's quite a simple and basic wing that McLaren ran for the season, there's not even a bend on the front plane. The nose on the 1996 is much more sleek and slimmer than the 1995 car, with a nice single keel solution to mount the front lower suspension wishbones.


You can see from the wireframe how the top of the nose has lots of polygons to make the smooth shape, which towards the front of the car is quite flat. I added the 3D body lines on the nose and the suspension cover. I also added suspension wishbone connection points to the bespoke suspension.


McLaren's side headrest solution was unique to them in that it creates a channel either side of the rollover bar. Getting the body lines around this smooth shape was difficult. The mirrors are asymmetrical, presumably to reduce the turbulent air generated, by having the smooth shape facing the direction of the oncoming airflow.


Moving into the cockpit, and I was able to find some reasonably good photos to re-create the dashboard and some of the buttons along each side.

In case you missed it, here was part 1 https://fongugp4.blogspot.com/2019/04/gp4-1996-mclaren-mp411-walkaround-part-1.html.

Stay tuned for part 3 tomorrow.

Friday, 26 April 2019

GP4: 1996 McLaren MP4/11 walkaround part 1

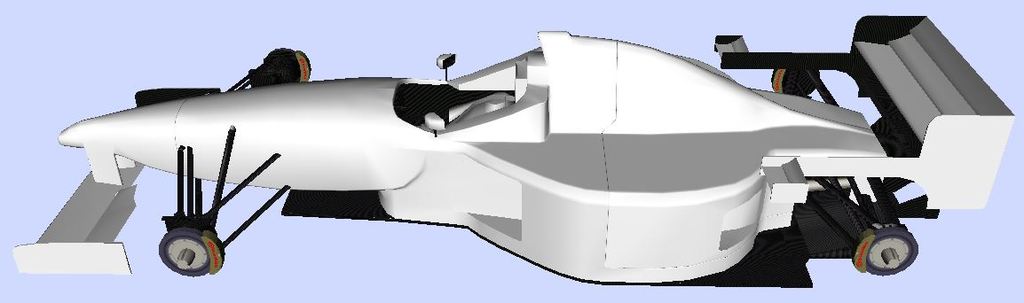
The first 1996 car ever released in GP4 was Eugenio's McLaren, which included a Monaco GP version with the winglet on the engine cover. Unfortunately I don't have a copy of that car, and I can't find any screenshots of it neither. If I remember correctly, he was working on an updated version years later but was not able to complete it, and so I stepped in and took over. I found this picture lying around, where the white parts of the car were all of Eugenio's work.


If you look carefully and compare the above shot to the end results below, you can see I did quite a lot of modification to it. It's always quicker when there was quite a lot of the car there already. I started by doing quite a bit of work on changing proportions to be more consistent with my other 1996 cars and also with photos as a base. After I was happy with the main shape and proportions, I got to work adding details to it.


This is another car painted by Celinho and this would be the final Marlboro liveried McLaren, having raced in the red and white scheme since the early 1970s.


There was a B spec version of the car that appeared late on in the season, the most notable change from the outside is that the front wing supports are angled rather than straight. This small change is included in the 1996 mod, although the mid-wing was never added. The camera also seems to have gone missing.


Anyway, I'm really pleased with how the shape worked out in the end. My thanks go to the contributors, with Quickslick and Soulbringer having an input too. Eugenio did a great job on the main shape and it was a pleasure to bring this car to completion.


I can't remember exactly, but this was certainly among one of the first 1996 cars that I was involved with completed after the Forti and Minardi. I added suspension (common parts from other 1996 cars) the cockpit, the engine and gearbox, the mirrors and added details such as the hump on the rollover bar and the body lines.


I also did quite a bit of work in smoothing out the normals. If you look at the first shot, there's lots of odd shadows on the flat surfaces and where the light bounces off in an odd way. This is an area I felt I helped improve.

In the next post, we will begin to look at some of the detailed work that's gone into this car.

Here's the car in rfactor 2.

Friday, 19 April 2019

GP4: 1996 Jordan 196 walkaround part 3

This is part 3 of my walkaround of my 1996 Jordan 196.


Moving onto the 2nd part of the sidepods, you can see the body line nicely. There is a slight undercut at the bottom of the rear of the sidepod, and with the vent there, it was not the easiest to get right.


The rear of the bodywork has this complex circle for the rear suspension mounts. The bottom part completes the coke bottle and is quite wide, but the upper part of the circle is quite narrow. It's always difficult to get this curve looking smooth from every angle.


You can see some of the detail I added to the rear wing endplates with the indent near the trailing edge. In the pre-season testing, the team didn't initially run with rear wheel winglets, so the endplate was much shorter, and you can see from the wireframe how the winglet is an additional extra.
The rear suspension is probably one of the first cars where I managed to get it as accurate as possible. With the wireframe, you can also see the vane that rises from the floor. At the time, there were a few photos of the inside of the 196, but there were better photos of the 197, which I used as inspiration for parts of the insides of my 196.


On the engine cover you can see where all the body lines meet without disrupting the smooth normals of the rest of the shape. There is also a small triangular vent under the Peugeot logo.


As mentioned in my other walkarounds, there were some interesting developments on the diffusers and I think Jordan's was the most complex and interesting. The main central section is curved, with the lower part of it narrower as we see on other cars. But there are many slits on the top edge of the central diffuser, this helps maintain the boundary layer and reduce the likelihood of stalling. The rest of the diffuser is lower in the central parts for the exhaust, which is a squat oval shape. The rest of the diffuser is then angled with a gurney flap on top.

You can see I modelled some of the rear suspension mounting points as well in more detail than I remember.


Whoever mapped the GP4 car and put it back together again has merged a lot of parts together I had initially intended to keep separate. So if you go and crash this car, not much falls off and you can't see much of the detail I put on the inside of the car. Here, you can see the curved rear bodywork and how it exposes the gearbox.


You can see how the sidepods channeled air towards the engine. By this stage, I had made individual cylinders on the engine myself. In terms of internals of a car, this car is probably one of my favourites, so I was a little disappointed that you can't appreciate that on the final car. However, I'm still grateful for all the contributors for making this car and its variants, it could still be sat on my hard drive unfinished.

All in all, this remains one of the best cars I've created and I think the end result is pretty good. If I was really picky, I'd say the rear wing could move rearwards a touch, but that is only minor. Here's some shots of the car in GP4.


You can download this car for GP4 as part of the 1996 mod.

Thursday, 18 April 2019

GP4: 1996 Jordan 196 walkaround part 2

Welcome back for part 2 of my 1996 Jordan 196 walkaround. There's quite a few screenshots to feature that I'd like to talk apart so there are 3 parts in total, but let's get into the detail now starting at the front of the car.


The nose and monocoque section has a nice flat side and then a smooth rounded top and bottom. So you can see how I tried to be efficient on polygon use on the flat regions compared to the curved ones which has lots more polygons. The front wing endplate has the small lip that comes out at the front bottom, and then it creates a little bit of an outwash, with the rounded bottom at the rear producing a vortices.

The lower front wing, like most of the grid, curves up on the leading edge in the middle of the car, whilst the trailing edge is flat. Like modern day cars, the upper front wing is separated from the central section to the main part. The front wing support is an interesting shape, because it doesn't really follow the contours of the nose (have a look at the front view in my previous blog) where the lower back part extends wider than any other part of the support. It took a few goes for me to get that right from various angles.


Not that you can tell as it's all black, but the suspension has a bit of detail added to the shape when it connects to the monocoque. The small barge-board also has 3D holes for the suspension to go through.


Again, hard to see when it is all black, but for me it's a first in modelling my first wheel hub and brake ducts.


The first sidepod inlet is an interesting shape. Like the 1995 car, the top part is smoothly merged to the car in a lovely rounded shape around the front of the cockpit. The lower part is attached to the tea-tray element of the floor. Because of the stepped floor to house the plank, the sidepod sits a little higher up than the floor. Again it wasn't easy getting the shape right for the top of the first part of the sidepod, it almost has two separate curves. I'm really pleased with the outcome though, and also the inlet for the second rear sidepod was not easy to get right, especially as it is slightly raised.

The hardest part to model of all was the body line that runs along the side of the cockpit. Not only are the lines curved, but the bodyline itself is on a curved part of the car. Though I'm happy with the positioning, I'm not all too happy with how it turned out compared to the other bodylines. Though I'm glad they are there rather than not there too.


Again, thankfully there were some good shots of the cockpit that I could find and try and get as accurate as possible. My only regrets is that none of the textures have put any effort into lighting up the dash, but at least the 3D rev lights are lit up.


Having shown the video of the converted rfactor 2 car, this is a video the car in Assetto Corsa.

Wednesday, 17 April 2019

GP4: 1996 Jordan 196 walkaround part 1

Next up in my walkaround series is the 1996 Jordan 196 Peugeot, which is one of my all time favourite cars. It's a very clean shape and has a bold gold livery (though my screenshots has the more mustard colour from the early season). Does anyone remember the pre-season testing livery with the green and white? I thought it looked good in that too. Anyway, as we get into some of the detail, there are lots of places of interest too.

As usual, you can read my model blog for comparison: Model Review. I wasn't particularly happy with any of the Jordan models, and that's because I spent a long time working on my own version, albeit in 3D.


I'm not sure who mapped the car, but Celinho did the original livery, and Quickslick and Kedy provided season specific updates I believe. There are a few little mapping issues, but overall I think we did the car justice, so thank you to all who contributed on this one.


Again, I post my plan views before going into the 3D views. Before I started creating cars for 1996, I actually did not use pictures as blueprints, preferring to do things by eye. However I had converted to starting shapes with pictures, but you have to be careful with perspective and if the shot is not quite straight, you may have to tweak the photos before you use them as a blueprint. I have, in the past, merged various photos together, so maybe a side shot without the wheel on. Anyway the reason I used them was to give an additional reference that my proportions were good in as many angles as possible.

This Jordan was the first car where I went all out on detail, both on outside the car and inside the car. As I came back to do this blog, I surprised myself with how much detail I went into in parts, so I can't wait to show you some of that. 

The car has a William-esque nose and monocoque section, very slim and nicely moulded. The continued with a Ferrari 640/61 style sidepod which they adopted for the 1995 car. They added a second inlet in a more conventional position. How this all smoothly integrates with the rest of the car is very beautifully done. Like Williams, they had a very low side-head protection, a new regulation for the year, and teams that had high ones were stuck with it for the season.


Moving towards the rear of the car and there is the rear sidepod cooling vane, which I think I created a cover for as an alternative at different GPs. Like most teams, the endplates extend past the rear wheels to a winglet just in front of the rear wheels, and again I quite like the curves that make it a bit more beautiful. Underneath that winglet, there is a large black vane emanating from the floor. McLaren had a small one on the MP4/9, but it's a solution that comes and goes, with them being a bit more popular in the mid-2000s. The central diffuser part is fascinating, but we'll get into that later on. They sometimes ran an extra third element on their lower rear wing, it wasn't there for all races.

As usual, the walkarounds are split into parts, parts 2 and 3 coming soon. Here is my car in rfactor 2 in the meantime.


Tuesday, 12 March 2019

GP4: 1996 Forti FG01B walkaround part 2

In case you missed it, part 1 of the 1996 Forti FG01B walkaround click here: https://fongugp4.blogspot.com/2019/03/gp4-1996-forti-fg01b-walkaround-part-1.html
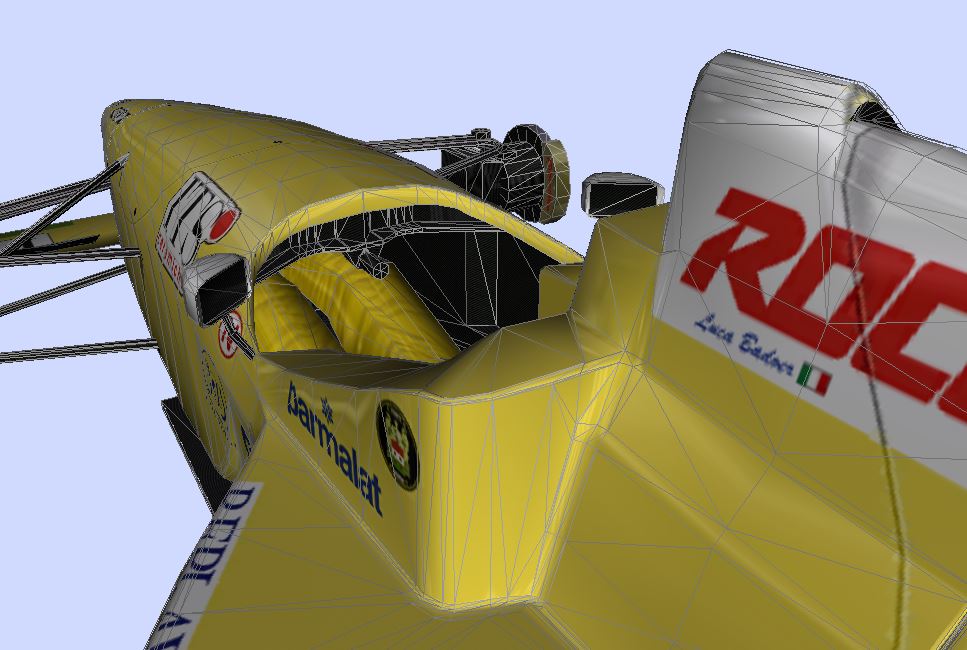
I was looking back at my old screenshots of this car before it was painted and found this photo:

The white parts are all the newly created parts, the yellow from the existing 1995 car.


Starting off at the front of the car, I remodelled the nose cone quite heavily from the 1995 car which was very low-poly. This is a lot smoother. Unfortunately there is shadow painted on the front wing supports that shouldn't be there, but I think it's a mapping issue.


I've shown the wireframe for this shot so that you can see I started working on smoothing the curve where the nose joins the the side of the cockpit. If I was doing that again today, I would put more polygons to smooth the curve even more.


I found one blurry shot of the cockpit which has this ledge on it. I'm not sure what it was for, maybe you could put your cup of tea there or something. I'm not too happy with the rear of the head rest, but I am pleased with how it joins to the chassis.


I'm quite pleased with how the sidepod turned out, that's one of my favourite parts of my work on this car. There is massive gap for the rear suspension elements which can't have helped the aero.


I like how in GP4 that you can crash the car and parts will fall off, and reveal some of the work going on underneath. The 3D body lines give a bit of depth to the nose.


I'm not sure why Celinho decided to paint his own body lines that don't follow the 3D ones. The hole at the rear of the engine cover (by the Ford logo) is painted on, and it's nicely done. The 1995 rear wing does not look out of place, and the new rear wing endplates fit on very well.


There aren't too many shots of the rear, so its difficult to model this accurately, but from what I could tell, with a little artistic licence, you can see they had a unique approach, with the central part looking more like an extended turning vane than a diffuser. You can see a lot of the gearbox/rear suspension and engine exhausts through the rear of the car.


Here, the car is without its engine and sidepod covers revealing the internals of the car. They are taken from Oggo's Benetton B196 (with permission), hence it comes a Renault engine logo. GP4 doesn't do shadows from the car onto itself, so whilst its nice to have nice textures on engine and a lovely shiny exhaust, in race conditions its usually under shadow and black.


I hope you enjoyed the walkaround of the Forti. It's not the best looking car (not really my fault!), and it's not one of my best models (compared to the rest of the 1996 grid), however many lessons were learned from this car that I developed into the other cars.

Monday, 11 March 2019

GP4: 1996 Forti FG01B walkaround part 1

In the second of my series of my GP4 cars walkarounds, I look back at the first car I created for the 1996 season, the Forti FG01B. There's a bit more about how Forti got on in 1996 in my model review blog post here: https://fongugp4.blogspot.com/2019/03/143-model-review-1996-forti-fg03-ford.html

The car was essentially an updated version of their 1995 car, the FG01, which itself was an updated F3000 car.

I'll come back that when I look back at the 1995 cars. So my starting point, similar to the Minardi M195B, was the 1995 mod version of the FG01 that I created.

1995 Forti FG01 from the GP4 1995 mod


I started off thinking I would re-use parts of the 1995 car, but eventually I would remake it all, with perhaps only the wings making it onto the FG01B.


Putting the two cars next to each other, you can see that there is a lot more detail and effort gone into the 1996 car, owing much to my own learning curve in modelling cars. The shape of the nose is a lot smoother, the sidepods are a lot more realistic and the engine cover is much closer to the real model. The side-head support looks like an after thought, just tacked on for the sake of the regulations, which was what the team did in real life.


The diffuser is pretty basic too, especially when we start looking at the other 1996 cars where teams had started to develop them since the major change in diffuser regulations during the 1994 season, Forti were left behind in this region.


The FG01B was just a stop gap whilst the team prepared for their actual 1996 car, the FG03 (which is beautifully made by Soulbringer in GP4). Like the Minardi, the suspension and damage model are taken from the 1995 mod.

Overall, the car is a step up from the models in the 1995 mod, but its probably the most clunky in terms of my shaping ability in the 1996 mod. I like the work on the nose and the sidepods, but the cockpit sides and the area just in-front of the sidepods I'd would do differently today.

The textures were done by Celinho and so my thanks go to him for painting it, though there are areas of the texture I'd like revisiting if I was around to give feedback when it was created. So below are a few shots without the textures applied.


I was still perfecting my technique of how to make a model with nice smooth normals around the curves and this was my first attempt at bodylines. In fact, the method I adopted for the Minardi for bodylines is the same that I use today, but this was my first attempt at them. You can see where the polygon lines are denser as to where I tried to make a smooth shape with the light bouncing off it correctly.

You can see from this angle from the rear how the engine cover was hastily amended to incorporate the driver side head rest protection. I can't imagine the wake coming off that and how draggy it would have been and probably would have made the rear wing much less effective.


Without the wireframe, you can see how the light bounces off each surface smoothly (ish). The bodylines are also clearly seen here, though looking back, I forgot to create the front suspension cover.

Click here for part 2, where I will look at some of the details of this car.
Below is a video of a converted version of my car in rfactor 2.


You can download this car along with season specific liveries in the GP4 1996 mod.
1996 GP4 Mod Download Part 1
1996 GP4 Mod Download Part 2